The Clipboard
& Scrapbook
The analogy of
using a clipboard and scrapbook to represent RAM memory and disk storage was
unique to the Macintosh back in 1984 and, along with the graphical interface,
revolutionized the concept of personal computing. Not only could you load applications
that allowed you to perform specialized tasks, such as database, spreadsheet,
painting, drawing, and word processing, but the clipboard enabled the user to
move or copy information from one place in the document to another place in
a couple of easy steps. It also gives the user the freedom to transfer information
from two distinctly different formats, such as from a paint file into a word
processing document. In 1984, this newly devised cross-format compatibility
opened the floodgate to a whole new way of using computers.
One very important
aspect of Photoshop is the ability to make a selection and then edit the contents
of the selection. If you wanted to create a circle, for example, instead of
using a pencil or pen tool or a brush, you could instead select pixels in the
form of a circle, and then paint or fill them with color.
 |
We'll
discuss the Photoshop tools hands-on, while learning how they work.
The Tools -
overview
To choose
a tool:
- Click
on it
- Move the
cursor to the image area
- Click,
or click and drag
One terrific
thing about Photoshop (and any well-written computer software) is that
it establishes a pattern of behavior, and then repeats the pattern so
that the user can "intuitively" anticipate how the software will respond.
For example,
clicking on the paintbrush, displays the palette that contains a variety
of "options" resulting in unique behaviors for the paintbrush. The options
palette, which is located just under the menu bar, allows the user customize
the tool's behavior. Once we've learned how to call up the options for
the paintbrush, we can assume that clicking on the pencil, for example,
should bring up the options palette for the pencil, allowing you to customize
its behavior.
The tool
palette is divided into discrete sections, grouping tools that have related
functions. If a tool displays a small "arrow" in the lower right corner
of the tool, clicking and holding down on the tool will pop up an additional
tool or tools with similar or related functions. Grouping tools in this
manner significantly reduces the size of the tool palette, keeping its
appearance neat.
We'll be
examining the uses and behaviors of Photoshop's tools and features more
closely as we use them in projects and exercises.
GET
TOOLS overview. This pdf file summarize calls out each of the
tools and summarizes their behavior.
|
|
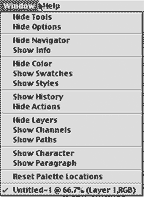

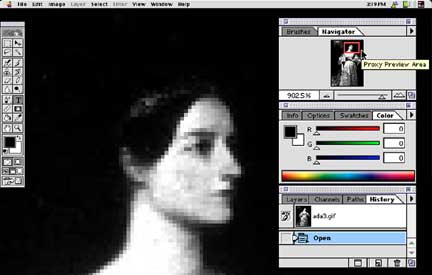
This
Palette shows tabs for each of the palettes docked here. Click on the
tab that indicates the name of the palette you want to display.
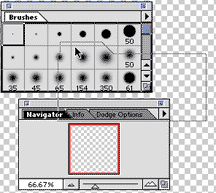
Shows
the process of reorganizing the palette positions, by dragging the "navigator"
up to dock it along with the brushes. Notice the "gray outline"
that follows the navigator palette into its new position. When the body
of the brushes palette assumes a bold outline, it is "in position"
and you can release the mouse button.
|
The Palettes
- overview
"Be
fruitful and multiply," takes on a whole new meaning when it comes
to Photoshop palettes--they sure are plentiful, and become more so with
each new version of the program, or maybe it's just my imagination.
Consider,
for a moment, that the "Options" bar at the top of the screen
is context sensitive. That means that its content changes depending on
which tool it is describing.
Access the
options for any tool by clicking on that tool and watch the options palette
at the top of the screen update.
The options
used to be contained in a palette, prior toPhotoshop 6.0.
The remainder
of Photoshop's palettes can be opened using the "Window" menu.
Notice that the tools are also considered a palette.
By default,
Photoshop "docks" palettes together in groups, which are indicated
in the window menu by the gray divisions in the window menu. Color, brushes,
and swatches each appear as "tabs," like the tabs on manila
folders. You can switch palettes by clicking on any one of the tabs.
If you would
prefer to have two or more of the palettes showing at once, click on the
tab of the palette you want to display and "tear it off" by
dragging the tab away from the palette. If you want to change the positions
of the palettes, so that they are docked in a custom manner, you can do
that, as well. Drag the "tab" of an open palette over the palette
you want to dock it to. Release when you see a bold outline appear around
the body of the palette, and you should now have your own, custom docking
station.
To separate
grouped palettes, drag the tab of the palette away from the group and
release the mouse button.
|
|
View your
file
 Probably
one of the most overlooked controls by novices using Photoshop is customizing
the way in which your files are viewed. Photoshop offers three different
viewing options and calls these the "screen modes." You can
change the screen viewing mode by pressing the letter "F" on
the keyboard. This works with or without the caps lock key depressed,
and toggles between the three viewing modes. Just keep pressing "F"
to get to the most comfortable view. Probably
one of the most overlooked controls by novices using Photoshop is customizing
the way in which your files are viewed. Photoshop offers three different
viewing options and calls these the "screen modes." You can
change the screen viewing mode by pressing the letter "F" on
the keyboard. This works with or without the caps lock key depressed,
and toggles between the three viewing modes. Just keep pressing "F"
to get to the most comfortable view.
If you prefer,
you can click on the icons at the bottom of the tool palette to change
your screen viewing mode. From left to right is the "standard screen
mode," "full screen mode with menu," and "full screen
mode."
To view your
image on a black background with nothing else in the way, press the "full
screen mode" button on the tool palette, and then press the "tab"
key on the keyboard to toggle the tools and palettes off. Pressing the
tab key again will toggle the tools and palettes back on. The "tab"
toggle is a handy feature and works in the entire Adobe product line.
|

|
|
Magnification
and Navigation
The Magnifying
Glass, located at the bottom of the tool palette, allows you to click
on the image to make it larger. Hold down the option key to change the
"plus" inside the magnifying glass to a "minus" and
click to reduce the size of the image. Click and drag with the magnifying
glass to fill the screen with the "selected" area.
Command "+"
and Command "-" are shortcuts for increasing and decreasing
image size.
The hand
tool is one way to move the image around within a window. Click on the
tool to choose it, move the cursor to the image area, then click and drag.
A new computer
user can quickly pick up speed and facility by learning to perform certain
types of operations without using only key commands. Learn to use both
your hands and reduce the number of mouse clicks by switching tools without
using the mouse to choose them in the toolbox. Instead, trying switching
using key commands.
If you see
a piano player sit down to play a tune with one hand, that's a pretty
good sign that they are a beginner and haven't had piano lessons. Learning
to coordinate both hands is key to piano playing, typing and using a computer.
It is important to be able to coordinate your hands on the keyboard and
the mouse, as well.
My favorite
way of getting around an image, when the image is bigger than the window,
is to use the hand tool. I am usually already working with a different
tool, like the rubber stamp or pen tool, when I notice I've run out of
real estate. That's where a temporary, quick switch to the keyboard shortcut
for the hand tool is helpful.
Listed below
are some of the ways to get around the image:
- Press
the spacebar with your free hand (the one that isn't using the mouse),
and the tool you are using will automatically change to the hand tool.
Click and drag, to move the window with the hand. (This doesn't work
if your current tool is the "text" tool.
- The magnifying
glass is a great way to kill two birds with one stone (what a barbaric
expression). Press command and spacebar to automatically change your
current tool to the magnifying glass. Click and drag to create a rectangular
"marquee selection," and the window will fill with the selected
area.
- The Navigator
Palette provides an optional method of moving around within the image
and combines scaling along with navigation. The best way to understand
the navigator is to experiment with it. The slider controls the scaling
of the image, while moving the red square within the Navigator Palette
moves the image around in the window.
|

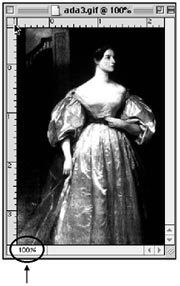
Sometimes
the magnifying glass and the menus don't get your image to the magnification
you want. If that's the case, try changing the scaling factor in the bottom
left corner of the window. Type in any percentage you want.
|
 |
| Menu
items that are "grayed out"are not available for selection.
|
The Menus
Like all software
applications, Photoshop has its own, unique set of menu commands. Adobe has
done a great job with the logical arrangement of the menus. The Window Menu,
contains all of the palettes and open documents. Pull down to any of the palettes,
release and that palette is opened. Open as many Photoshop documents as RAM
will allow, and switch between documents using the Window Menu.
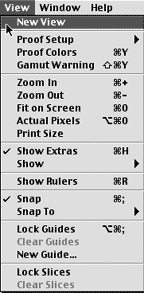
View Menu
The View Menu groups
together the various options that regulate the way in which the user views the
current Photoshop document.
New View
- allows you to create a second window for the same document. You can set different
screen sizesÉone can fit to window for an overview, and the other can be zoomed
in to a specific area. Then, if you edit on the close up, you can see the two
views side by side for easier evaluation.
Preview
- You will probably want to use this if you plan to have your color image printed
on a printing press. We usually begin working on a color image in the RGB mode.
Scanners scan in RGB. If you are getting files over the internet they are probably
RGB images, which are smaller than a CMYK image. Preview allows you to "test
run" the color shift that occurs when you convert from RGB to CMYK by changing
the only display to CMYK, without changing the file, itself.
Gamut Warning
- another handy device that shows which areas of your image fall outside of
the CMYK printing gamut. Use the sponge tool with its various options to gently
desaturate the "silver" areas.
The next section
of menu items all have to do with the magnification of the image on the screen.
Zoom In
- Increases image size in window
Zoom Out
- Decreases image size in window
Fit on Screen
- increases or decreases image to fit it in the window
Actual Pixels
- viewing an image at anything but actual pixels may create distortions in the
pixels in its attempt to approximate the image. Actual pixels is the only view
that shows the image at the 100% zoom ratio with no distortions.
Print Size
- the purpose of this is to be able to look at the screen and see the size your
image will print. It uses 72Êdpi monitor resolution as the basis for establishing
the print size, but since not all monitors are 72Êdpi, print size is not always
accurate.
ShowÊ/ÊHide
Rulers - Use this to get at actual size to get a better idea of the
size your image will print. You can also use this to measure parts of the image.
The horizontal and vertical rulers meet in the top, left corner of the window.
Click on the crosshair at the junction and drag the crosshair to any location
to change the "zero point," the place where the ruler measurement begins to
measure elements within an image.
HideÊ/ÊShow
Edges - hides or shows the edges of a selection
HideÊ/ÊShow
Path - hides or shows path
HideÊ/ÊShow
Guides - hides or shows guides
Snap To Guides
- lets you move layers and selections to line up precisely with the guides.
"Snap ToÉ" acts like a magnet and attracts selections and layers that are near
enough.
Show Grid
- build grids to aid alignment
Snap To Grid
- lets you move layers and selections to line up precisely with the
grid. "Snap ToÉ" acts like a magnet and attracts selections and layers that
are near enough.
FILTERS
The filter
menu - the best way to learn the effect each of the filters has on a
given image is to select a small area of the image and experiment. Each filter
contains a set of instructions that alters the selected pixels, or if no pixels
are selected, the entire image of the target layer.
The exercises in
these notes will review some of the more commonly used filters.
SELECT
The select
menu - contains a number of different ways to alter the selection area.
LAYERS
The layer
menu - everything that is in the layer palette is in the layer menu,
plus more. The menus here, as elsewhere, are divided into sections, grouping
instructions based on similar relationships. For example, objects that will
have effects applied to them can be put on a discreet layer, and then have the
effect applied to that layer.
Effects are shown
below in the Layer Menu.
IMAGE, EDIT,
and FILE MENUS
The preferences
are found under the File menu. Every program has its own unique set of menus
and preferences. Rather than review them in cookbook fashion, I will be discussing
them as needed as you work on a series of exercises designed to help you learn
the distinct features and capabilities of Photoshop.
Selection Tools
and techniques
Deciding the most
effective approach to editing an image and then determining which pixels need
to be changed challenges beginners and experienced Photoshop users, alike. We'll
be exploring various selection techniques in upcoming exercises. The art in
making selections is deciding which of the various tools and techniques to use
when creating a selection. The purpose of a selection is to call out specific
pixels so that you can edit them without affecting the surrounding pixels.
We also call a
selection a mask, because all but the selected pixels are protected, or "masked."
A selection may also be referred to as a channel, for once the selection is
saved, it is stored in a channel so it can be called up for future use.
Figure 9-24 shows
the first in a grouping of tools that have related functions. Notice that the
marquee and lasso selection tools both display a tiny arrow in the button's
lower right corner. Try clicking and holding the button down to display other,
similar tools residing in a popup toolset.
MARQUEE SET
Rectangle -
Click and drag on desired layer to select pixels bounded by a rectangle.
Ellipse
- Click and drag on desired layer to select pixels bounded by a ellipse.
Row - Click
to select a horizontal row of single pixels
Column -
Click to select a vertical column of single pixels
Cropping tool
- Crop your image to any dimension, or double click on the tool to set a
specific width, height and resolution. The tool will constrain to the specified
dimensions and the image will be resampled to the new resolution.
Lasso set Lasso
- Click and drag to make a freehand or irregularly shaped selection
Polygon -
Click to create anchor points for straight sided selections. To complete selection,
click on the starting point of the polygon. Hold down the option key and drag
to switch to a curved section and release to continue drawing straight sides.
Magnetic lasso
- Works best with high contrast images where the foreground and background are
distinctly separated. Click to being selection, then move (don't drag) cursor
around edge and it will shrink to the foreground image. Click on starting point
to complete selection.
Magic Wand -
The Magic Wand makes selections based on the value of the pixel you click on.
Tolerance
- Determines the range of pixels selected. The default, 32, selects 16 above
and 16 below the pixel you click on. Values between 0 and 255 are acceptable.
Anti-aliased
- Softens the edge of the selection and feathers to transparency created the
illusion of a blend with the layer or background behind.
Contiguous
- Selects adjacent pixels that fall within the tolerance range.
Use All Layers
- Selects pixels based on tolerance settings through all the visible layers
in a document.
SELECTIONS -
What Now?
Once you have made
a selection, you have the option to refine it or modify it before you edit the
pixels contained within the selection. If your first try doesn't result in the
perfect selection, you can always deselect and start over É Select MenuÊ>ÊNone,
or press Command D.
Deselecting isn't
always the best way to go, especially if the selection was a difficult one.
Instead, just try modifying the existing selection. It's pretty easy to accidentally
lose a selection by clicking outside of the selection, so in order to safeguard
against accidental loss, you can undo, or open the history palette and back
up to the level where the selection was made.
You always have
the ability to save a selection by going to: SelectÊ>ÊSave Selection. Take a
good look at the Select Menu, which is essentially, a list of ways you can modify
which pixels are selected. Think if it as, "Things you can do to a selection."
The menu displays keyboard equivalents on the right hand side, which are an
alternative to using the mouse and menu.
All - Selects
all pixels on the target layer, including the transparent pixels. Command-click
the layer name on the layer palette to select everything but the transparent
pixels. Or select all, choose the move tool, and then use an arrow key on the
keyboard to nudge the selection and the marquee will shrink to the filled pixels.
Deselect -
Removes active selection
Reselect
- An "undo" command for Deselect
Inverse
- Selects the opposite of the actively selected pixels
Color Range
- Select pixels based on colors in the image, preset colors, luminosity
or colors that are out of gamut.
Feather
- Modifies the edges of the selections in order to create a gradual blend to
transparency
Modify -
Contains additional options to create a soft border around a selection, smooth,
expand or contract a selection
Grow - Increases
the range of the selection based on the current tolerance setting in the magic
wand options
Similar
- Selects other, non-contiguous areas of similar color on the target layer
Transform Selection
- Places transformation handles on the selection so you can perform scaling,
rotation and move operations without affecting the contents of the selection
 |
Move the
selection marquee
Once you've
made a selection, you can move the selection marquee to a new location
in the image window by placing the cursor over the selection, clicking
and dragging.
|
 |
Move the
contents of the selection
You can move
the contents of the selection by choosing the move tool, moving the cursor
over the active selection, then click and drag to a new location in the
image window.
|
 |
Move entire
layer
If the move
icon appears like the one above, it indicates that the move tool is not
going to act on a selection, or the contents of a selection, but on all
of the pixels on the layer. This technique comes in handy for collaging
images. When two files are open side by side, you can drag the active
target layer from one file to another, which, in effect, copies the layer
from one file to a new layer on the second file.
|
 |
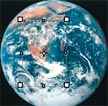
Transform
selection
Once you
have made a selection, you can change the size and orientation of the
selection marquee. Drag on a corner point to scale both horizontal and
vertical axes, drag a center handle on the perimeter to scale in a single
orientation. Click and drag inside the boundaries to move, or click outside
a corner handle to perform a free rotate.
|
|


|
Add to
or subtract from selection
You can add
to, or subtract from an existing selection by using the shift key to add,
or the option key to subtract from an existing selection. Choose the appropriate
selection tool and hold down the shift key, click and drag to add to the
selection area. To subtract, choose the appropriate selection tool, hold
down the option key, then click and drag. When you release the mouse button,
the selection area will be adjusted.
|


 Probably
one of the most overlooked controls by novices using Photoshop is customizing
the way in which your files are viewed. Photoshop offers three different
viewing options and calls these the "screen modes." You can
change the screen viewing mode by pressing the letter "F" on
the keyboard. This works with or without the caps lock key depressed,
and toggles between the three viewing modes. Just keep pressing "F"
to get to the most comfortable view.