Introduction
to Adobe Photoshop
Adobe Photoshop,
has changed the face of editorial and advertising design and raised the bar
for professionals in every discipline that incorporates photography and design.
Take a trip to the library and look at graphic design, photography and advertising
from 25 years ago and compare it to anything you find in a magazine today, and
I guarantee that the difference will be astounding. Whether you are interested
in graphic design, printing, illustration, animation, film, broadcast television,
multimedia, web design, or e-commerce, Adobe Photoshop is a basic must-know
application and is used in each and every one of these disciplines. Photoshop
is used for a variety of photographic, typographic and graphic design techniques.
What is it?
Adobe Photoshop
is a raster program, and uses a bitmap format which renders images pixel by
pixel to a variety of output devices. Due to the nature of Photoshop's raster
technology, it is the perfect tool of choice for working with photographic images
because of its ability to make global or selective color changes.
While Adobe Photoshop
is a very complex and powerful software application, the way it operates is
actually quite straightforward. It is a tool that can be used by a beginner
with just a few minutes training, or by an advanced user performing very complex
operations. The essential Photoshop requires that you understand how to use
the copy / paste process and that you understand the concept of selecting before
applying changes to a given element within a document.
Several scanner
manufacturers give away a watered down version of Adobe Photoshop with each
scanner they sell, while most scanner manufacturers include "plug-ins" for their
scanning software which work in conjunction with Photoshop.
Photoshop's wide
variety of brush-like tools also make it a good choice for creating images that
use illustration and airbrush techniques, patterns and textures, and collages
that take advantage of the program's ability to create transparencies using
both color and texture. Photoshop's unique tool set has spawned a new way of
imaging, one that photographers, artists and designers are learning, enjoying
and sharing with a new generation of creatives.
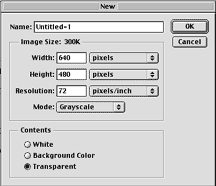 |
The new
document dialog
Before beginning
any new image, you'll need to set up the specifications of the new image
in the "new document" dialog box. You can name the file now,
or wait until you save the file. I like to wait, because if I name it
when setting up the document, I sometimes forget that I have not yet saved
the file. I know when I see "untitled" in the title bar that I still need
to save the file. So, I recommend waiting until you save to name the document.
|
| The
New Document dialog box is where you enter the starting size of your document
(it can be changed later by increasing or decreasing the canvas size), the
resolution, the color mode, and the contents, which controls whether the
documents starts out as transparent or opaque. The moment layers are added
to a document that begins with "white" contents, you have introduced
the ability to acheive transparency. |
INTERPOLATION
Interpolation
is the process of determining new pixel data when an image is resized,
has its resolution changed, or has had other transformation performed.
Nearest
neighbor - this is the fastest method of determining the new pixel
data. The software looks at the nearest pixel for color information and
will not add color data that it doesn't find present nearby. While not
usually preferred, this may work best on files that are saved in the "Indexed
Color" mode.
Bilinear
- the software analyzes data from a small sampling and based on the information
in those pixels, determines the new pixel data.
Bicubic
- (slowest and usually the preferred and most accurate method) this method
takes the longest because it analyzes the widest range of data, gathering
information about the pixels inside and outside of the area to be transformed.
|
Image Size
You'll need to
enter the width and height of the new document. Don't worry if you are not positive
about the dimensions--you can always change them later. You'll have the choice
to enter the size in pixels, inches, points, picas, centimeters or columns.
Photoshop lets you change the unit of measurement at any time during your work
session. Notice the relationship between the height and width, the resolution
and the "image size:" in kilobytes or megabytes. The amount of disk space an
image occupies is directly related to its height, width, resolution and mode.
That's one reason these specifications are grouped together in the box labeled
image size.
Resolution should
not be changed once you have created the document. You should determine the
appropriate resolution for your document when you create the new image file.
It is never a good idea to increase the resolution later. You can decrease it
later, if necessary, however it is not recommended. Whenever you increase or
decrease resolution on an existing image, the program has to decide the position
and color of the new pixels by a process called interpolation, and you run the
risk of degrading the image quality.
Mode
Bitmap -
Choose this if you want to create monochrome line art, consisting of
only a single value, black on white or white on black with no shades of gray.
This is the default scan mode for line art.
Grayscale
- Use this if the image you are creating will be printed using a single
color ink but has more than one value, or shade. This is the default scan mode
for scanning grayscale (256 gray levels)
RGB - Begin
with this mode if you are creating a "full color" or multi-color image. Work
in this mode for images designed for the internet or until you are ready to
prepare the image for a page layout program, and / or print.
CMYK - Work
in this mode if you want to create an image which will end up on the printing
press. Because many filters are disabled in while operating in this mode, it
is not uncommon to begin the image in RGB and convert to CMYK when you are ready
to output to your page layout program. Once you have converted an image from
RGB to CMYK, you cannot make further mode conversions without corrupting the
separation data.
Lab -
Use this if you will be burning a CD or creating image data that must maintain
its color conversion integrity on all platforms and all monitors. Lab color
is used primarily for high end distribution of original and stock photo CD images.
Exercise
#1 Create a Mask
Masks are the very
heart of Photoshop. You will be creating some of your own masks in this exercise
in order to understand the characteristics and behaviors of a mask. This exercise
is designed to familiarize you with the following:
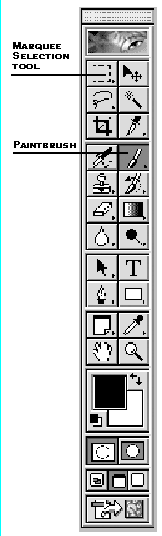
- Marquee Selections
- Paintbrush Tool
- Masks
- Eraser
- Color defaults
 |
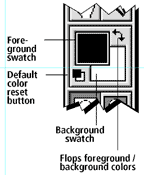
1. Begin
the exercise by creating a new document. Size = 5" x 5", Resolution = 72 ppi,
Mode = grayscale, Contents = white. See the "new document"
dialog box Click okay, and be sure that your foreground / background color
swatches are set to black and white, the default colors. Press the letter
"D" on the keyboard to reset the colors to default black foreground, white
background.
2. Select
the Rectangle Marquee tool. Click on it with the mouse, or press the letter
"M" on the keyboard to activate the Marquee tool.
3. Move your
cursor into the image area, and click and drag on a diagonal to create
a rectangular marquee. To constrain the marquee to a perfect square, press
the "shift" key while dragging.
A
document that is set up as a white document in the "new document"
dialog has no Layers, so when you use the eraser, the computer changes
the erased pixels to the background color. If you use the eraser on a
document set up with transparent contents the eraser clears the pixels
to transparent.
|
|
|
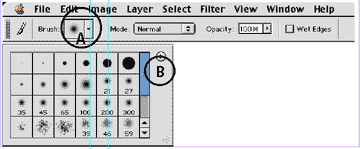
4. Select
the Brush from the tool palette by clicking on it, or press the letter
"B" on the keyboard. The brush options appear just under the menu bar.
Click on the arrow to the right of the "Brush:"and choose any of the
large brushes in the top row by clicking on it. Beginning at the far
left side of the image window, click and drag to the right, crossing
over the selected pixels, and finish by dragging to the right edge of
the window.
5. Next,
in the brushes palette, choose the brush in the second row, directly
below the first brush you chose and repeat the procedure in step 4 above.
6. Deselect
by pressing Command-D, or go to the Select Menu > Deselect. Let's take
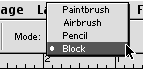
look at the Eraser Tool. Click on the eraser in the tool palette to
select it, or press the letter "E" on the keyboard. The options for
controlling the behavior of the eraser appear just under the menu bar.
The behavior of the Eraser can be customized like a Paintbrush, Airbrush,
pencil or block. Experiment with all the styles and return your canvas
to white.
7. You'll
be saving your file, but before you do, let's set up the preferences
for Saving Files. Go to Preferences > Saving Files Preferences allow
the user to make specific determinations concerning image previews,
the file extension, and file compatibility. It's a good idea to get
into the habit of Appending the File Extension, which means that when
you save the file, Photoshop will automatically add the period and the
three-letter file extension describing the format in which the file
is saved.
8. Save
your file by going to the File Menu > Save. Choose the appropriate format.
We'll use the Photoshop format. In this case, the file extension is
".psd."
|
 |
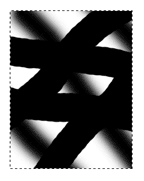 |
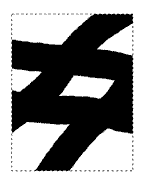
| This
image uses the standard paintbrush. Notice the edges of the stroke. Can
you see the difference between the standard brush and the feathered brush
in the image to the right? |
Observe how the brushes
interact with the edge of the selection marquee. What effect does the selection
have on the image? Describe the ways in which a selection behaves like a
mask. Which pixels are editable and which pixels are masked? |
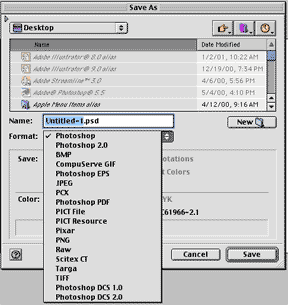 |
The
"Save" diaog allows you to choose the file format for the file
you are saving. If your file contains more than one layer, be sure to
check the "layer" box in the save options, which is hidden under
the pop-up format options.
|