Floating Sphere
This assignment consists of three parts, each to be saved in the .jpg format, attached to an email and sent to the instructor for credit:
|
Creating a sphere has been a tradition in my class every since visionary, Kai Krause, began publishing Kai's Power Tips & Tricks on the internet. I have updated and modified the sphere and shadow exercise over the years. This exercise is designed to familiarize you with the following:
|
 |
| Foreground / Background color palettes | |
|
4. Next, select the ellipse marquee and prepare to create a circular selection, roughly in the upper center of the window. Pressing the "M" key on the keyboard switches the currently selected tool to the selection marquee. 5. Go to the Windows Menu > Palettes > Show info. The Info Palette tells you an awful lot about what's going on in your document window. Right now, we'll be concerned with the size of the circular selection that we'll create. Begin in the middle of the screen, hold down the option and shift keys, and click and drag to make a circular selection. Make sure to release the mouse button before releasing the keys. The option key forces the selection to be drawn from the center out--the shift key constrains it to a perfectly proportioned circle. As you drag, watch the "W/H" or width/height coordinates in the Info Palette. You want to create a circle that's about 3 inches square. It doesn't need to be perfect. After you've drawn it, you can move the selection without moving the contents by moving the cursor over the area of the selection. The cursor should look like this , indicating that you can move the selection marquee by clicking and dragging.
|
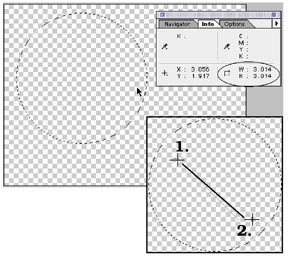 |
| Top right - the Information palette, with the width and height of the selection marquee live updated. Top left - A circle marquee selection. Bottom right - Beginning and ending points for radial gradient. | |
|
You need to make sure the "marquee" tool is highlighted in order to move the selection marquee. The "move" tool works on the pixel content of the selection. If there is no pixel content, the above warning will appear. |
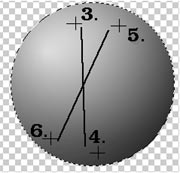
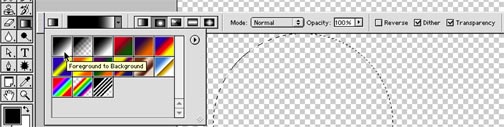
6. Next we will be creating a Radial Gradient using the radial gradient tool found in the tool popup. Click on the arrow to the right of the ramp in the options palette to pop up the palette where you can select the Foreground to Background gradient. Click and drag from #1 (This will be the foreground starting point) to #2 (this is where your background color ends up). The shorter the distance between #1 and #2, the more severe the blend--the longer the distance, the more subtle the blend. *Note: Your starting and ending points do not need to be inside the selection marquee. If desired, you can continue to add "layers of transparency" over your sphere by changing the opacity and repeating Step 6. A Shortcut to changing the opacity is to press the numbers on the numeric keypad on your keyboard. 1 = 10%, 2 = 20%, 3 = 30%, and so on.
Demonstrates the technique for adding additional overlays of semi-transparent gradients for a more subtle overall blending. |
 |
|
|
New layer icon adds another layer to the illustration, |
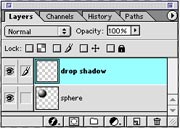
7. You will create the drop shadow on another layer, so go to the Windows Menu > Palettes > Show Layers. Click on the "New Layer" icon at the bottom of the palette to create a new layer. Name it "Drop Shadow." Note that the layer is now on top of Layer #1 in the palette. If you like, you can rename Layer #1 by double clicking on the Name, Layer One. You'll get a dialog that let's you rename the layer--rename it "Sphere." |
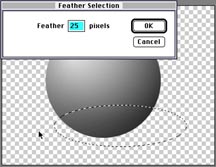 |
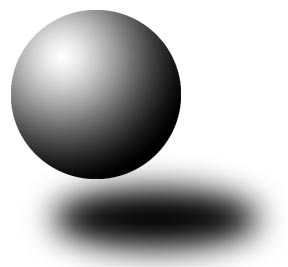
8. Click on the "Drop Shadow" name in the layers palette to make sure that your next action happens on that layer! Choose the marquee selection tool and make an elliptical selection that will eventually be your drop shadow. Make sure it is the correct shape--nothing looks sillier than a circular drop shadow. Stretch it horizontally off to the lower right (since your light source came from the upper left) Go to the Select Menu > Feather and assign a value of 25 pixels. You can assign a higher or lower value to change the density of the shadow and the quality of the shadow's edges. It's quality should reflect the qualities of light and dark that you assigned to the blend on the sphere. The severity of the shadow depends on the intensity of the light source and the distance of the object above the surface. 9. When you are satisfied with your selection, go to the Edit Menu > Fill and choose Background Color. |
|
The order of layers can be changed by clicking on the name and dragging it up or down into a new position. |
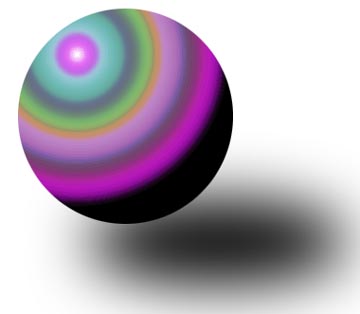
10. Now the only problem is that the shadow is on top of the sphere instead of below it. You can fix this easily by clicking on the "Drop Shadow" name in the Layers Palette. Then drag it below the "Sphere" name. Notice the black bar and arrow that follows the little "fist" icon. When you release the Drop Shadow, the Sphere should now be the first name in the layers palette. Cool, huh? Now here's something fun to do. First make sure you save your work again. Then do a "Save As," call it "Fun Sphere," and have at it. 11. Go to the Mode Menu > RGB color to change your color mode. You will be asked if you want to flatten your image. For now, say don't flatten. 12. Making sure that you have the "sphere" layer highlighted, go to the Image Menu > Adjust > Hue/Saturation. Click on the colorize button and then play with the HSL sliders until you get something you like. 13. Next, try marbleizing your sphere by going to the Image Menu > Adjust > Curves, and manipulate the curve by clicking to set additional "drag points," or click on the Pencil at the bottom of the dialog; then draw your own "erratic" curve and click on the "Smooth" button. If you have the preview box activated, you will be able to check your progress before clicking okay. Try it! |
 |
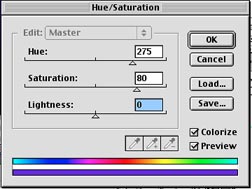 |
| Curves allow you to change the tonal values of any area of the image. Erratic changes such as those above result in effects such as those on the sphere below. | The Hue/Saturation dialog to the left lets you change the hue (red, orange, yellow, green, blue, indigo, violet), the amount of saturation and how much or little luminance is applied to the image. |
 |